


How To Repair Your Silicone Mermaid Tail
Got a tear in your beloved silicone mermaid tail? Don’t panic—repairing it is easier than you think! 🧜♀️✨ In this step-by-step guide, we’ll show you exactly how to fix your silicone mermaid fluke at home, saving you money and keeping your fin in top shape.
Corinna Schwozer
1/29/20256 min read
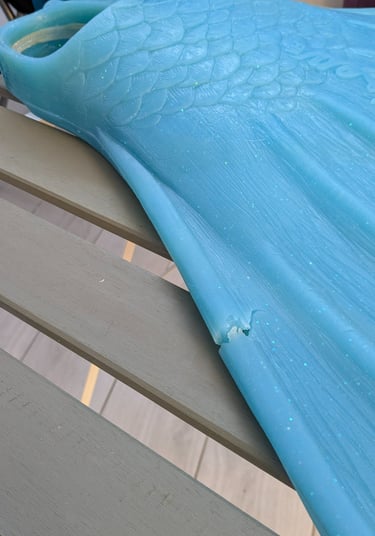
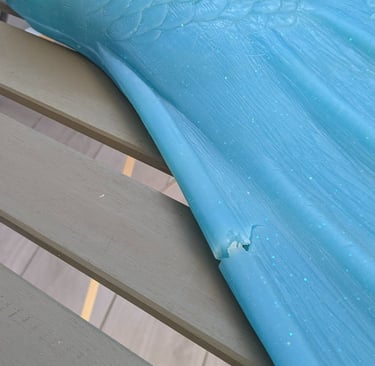
If you’re reading this, you’ve experienced one of a mermaid’s biggest nightmares: pulling out your beloved silicone tail—your trusty swimming companion for years—only to discover the rip. That tiny, unwelcome tear staring back at you feels like it’s shouting, “Your mermaid days are over!” But don’t panic, merfolk, because I’m here to tell you that your fin can live to swim another day.
As the CEO of MerMapp and someone who’s been mermaiding for years, I know how attached we get to our tails. My own fluke disaster happened to my currently only silicone fin—a beautiful Fantasea Fin from Mertailor, which I bought on a trip to Florida five years ago. (I mean, could there be a better souvenir?).
If you’re in the same situation like me where you don’t have a “mermaid fin doctor” around and shipping it to the MerTailor himself would cost more than buying a new fin right away, then this blog article is for you as I’ll let you in on the step-by-step how-to which my husband and I went through to DIY repair a dragon skin silicone mermaid fluke successfully.
So if this is you, grab your tools (and maybe a buddy), and let’s dive into repairing that fluke so you can keep making waves!
Before You Start: What You Need to Know
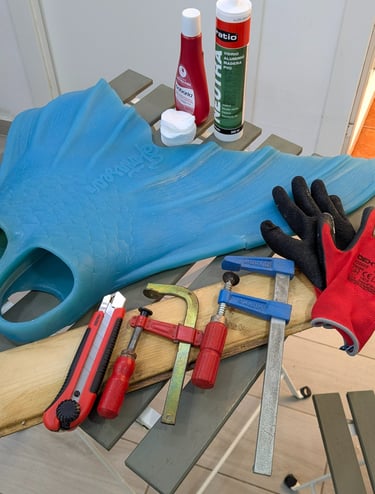
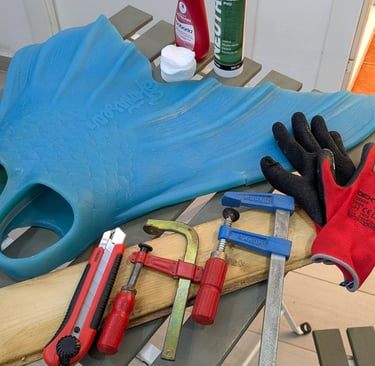
What You’ll Need: Your Mermaid Toolbox
Here’s your list of repair essentials:
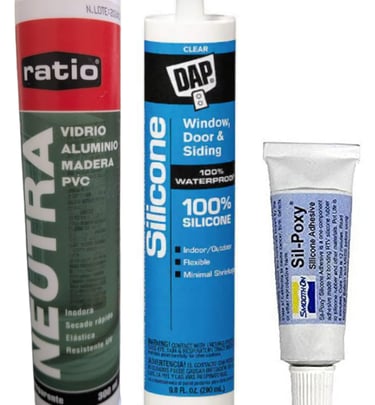
Silicone: If you’re in the US, Sil-Poxy is your go-to (although it is quite pricey!)—it’s reliable and safe for Dragon Skin silicone. If you’re elsewhere (or don’t want to spend as much), look for a 100% silicone product that is marked as neutral (aka "non-acidic"), transparent, and ideally waterproof (this is what would be closest to what we used if you're in Europe, and this one in the US). Important: Do not use Dragon Skin silicone to repair your tail—it doesn’t bond well with itself after it’s fully cured.
Silicone gun (optional): You cannot simply squeeze out the silicone with your hands. You CAN do it DIY like my husband did, but it's A LOT easier (especially if you're not thaaat strong) with a silicone gun like this one on Amazon EU or Amazon US.
100% acetone: For cleaning the repair area.
Cotton dabs and tweezers: To clean thoroughly without leaving residue.
Clamps: Any sturdy clamps will do, depending on your tail’s tear.
Plastic buffers: Small plastic pieces to protect your tail from clamp marks.
Wooden piece (optional): If you need to secure the tail while clamping.
Gloves: Silicone can irritate your skin—so don’t skip these!
Breathing mask: Silicone fumes aren’t mermaid-(nor human-)friendly. Ventilate your workspace and stay safe.
Paper towels: For cleanup and excess silicone.
First things first: This guide is specifically for repairing silicone mermaid tails made of Dragon Skin silicone—like my Mertailor Fantasea Fin. If your tail is made of another material, these steps may still help, but be sure to double-check the compatibility of the silicone you use.
Also, silicone repairs aren’t magic (although they might feel like it). To make sure your chosen silicone works with your tail, buy the silicone product and test it on an inconspicuous area the day before you want to do the actual repair. Apply it on a small area, let it set for 24 hours and check—if it peels off easily, you’ll need a different product.
Why Safety Matters
I know, I know—gloves and masks aren’t the most glamorous part of mermaiding. But trust me: silicone can irritate your skin, and the fumes aren’t safe to breathe in. Even if you’re confident like my husband (who skipped gloves because he’s been working with silicone for years - and didn’t use a breathing mask as we had the door to our terrace completely open the entire time), it’s better to stay on the safe side.
A well-prepared workspace is half the battle. Make sure you’re set up in a well-ventilated area—silicone fumes are no joke. Lay down some plastic or old paper to catch any spills, and clear a spot where your tail can sit undisturbed for 24 hours.
Step 1: Prep Your Workspace
Before you can work your magic, your tail needs a good scrub. All the chlorine, salt, dirt, or/and dust that it has accumulated over its days will make sure that the silicone doesn’t stick well - even if it IS the right product.
Wash the fluke with soap and water, then rinse thoroughly.
Dry it completely.
Use acetone to clean the area around the tear. Be thorough but gentle—any leftover oils or debris will weaken the silicone’s bond. If tiny bits of cotton stick behind, use tweezers to pluck them out.
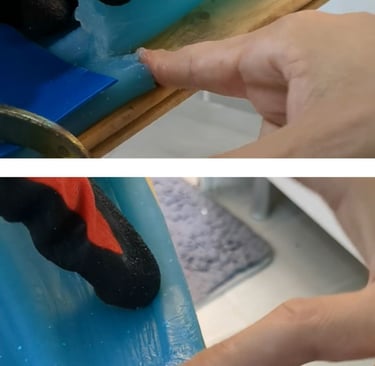
Step 2: Clean Your Fluke
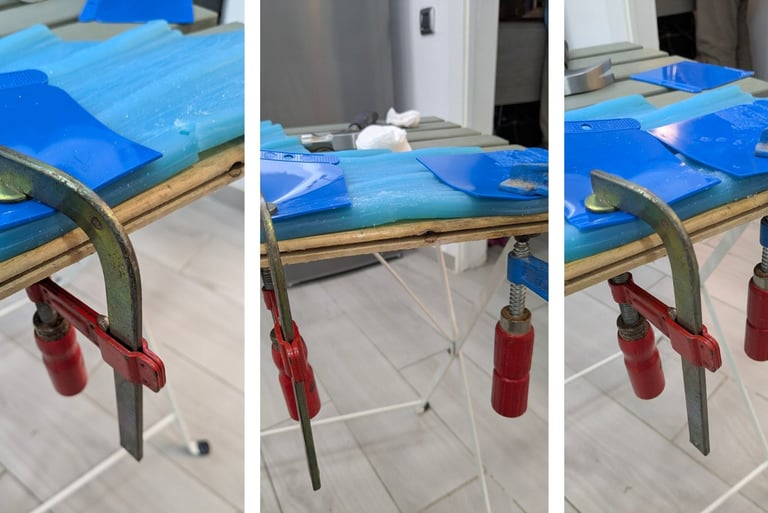
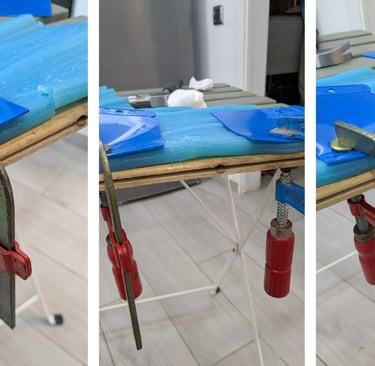
Clamping is crucial—it ensures a strong, seamless bond.
Place a wooden piece (or anything else sturdy) under the fin for support.
Secure one side of the rip with a clamp, using a plastic buffer between the clamp and the tail to avoid marks.
Step 3: Clamp It Down Part I

Step 4: Apply the Silicone
Here’s where the fun begins. If you don’t have a silicone gun (we didn’t), you can improvise. My husband pressed the silicone bottle against a mop to squeeze it out—proof that where there’s a will, there’s a way. (That said, if you have a silicone gun, please use it—it’s so much easier!)
Tips for Applying Silicone
Spread generous amounts of silicone inside the rip and along both sides of the tear. It should spill over the edges a bit.
Smooth the silicone as much as possible—this will be the visible part once it’s dry. Don’t stress too much if it’s not perfect though. You can add more silicone onto it afterwards to smooth it out - or, if you’re covering up your fin with a cloth costume part, nobody will see it anyways.
Step 5: Let It Rest
Step 5: Clamp It Down Part II
Press the rip together and secure the second clamp to keep the pressure on. Again, use a plastic buffer to protect the tail.
As to where to place the second clamp - it depends on the tear.
We first wanted to place it to the other side of the tear - however, noticed that this made the ripped parts slightly upward. So even though we were a bit anxious to have the plastic buffer stick to the actual fin, we decided to place it directly on the rip.
In the end, the plastic was easy to separate from the actual fin, so we’re glad we did it this way. But again, it might be different if the rip is slightly different.
Patience is key! Let the silicone cure for at least 24 hours. Avoid moving or bending the tail during this time—it needs to set properly.
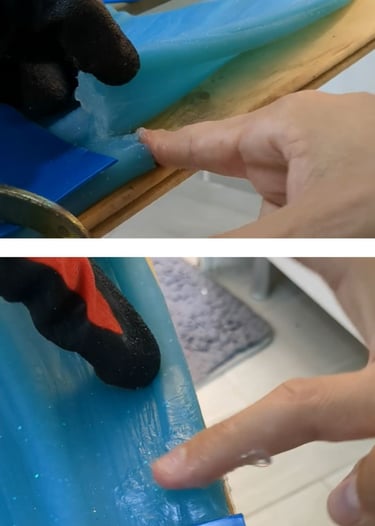
Step 6: Test It Out
After 24 hours, remove the clamps and gently wiggle the tail to check the repair. If everything looks good - stretch it and bend it some more to make sure it really is good to deal with any of its usual “stress” on land. If still everything looks dandy, it’s time for the ultimate test: take it for a swim!
Bonus Tips for Smaller Repairs
Final Thoughts: Keep Swimming Strong
Celebrate Your Success
If you’re dealing with smaller issues—like scales lifting off—you can skip the big clamps. Sometimes, all you need is a small needle or clip to hold things in place while the silicone cures.
And voilà! You’ve just saved your tail and extended its life. Whether it’s your first repair or your fiftieth, there’s something so satisfying about bringing your fin back to life.
Repairing a silicone tail might seem intimidating, but with the right tools and a little patience, it’s totally doable. Plus, there’s nothing quite like the feeling of swimming in a tail you’ve fixed yourself—it’s a reminder of how resourceful and resilient we mers can be.
Have you repaired a tail before? What’s your go-to method? Share your tips with the MerMapp community in our #crafts-and-diy channel on Discord — and if you found this guide helpful, let us know! 💙
Also - if you're more of a video-learner, check out our recording of our repairing procedure filmed step-by-step.
Happy swimming! 🧜♀️✨


APPearl LTD
Nikiforou Vretakou, 5, Flat/Office 101
8035, Paphos, Cyprus
registration number: HE 433676
VAT number: 10433676W
Contact Us
+(357)96520653
contact@mermapp.com
©️ 2021-2026
Crafted with 💙
by APPearl LTD